Online Bookings
Let your clients book their own appointments -- anytime, anywhere. Salonnare has a built-in online booking page you can share on your website, social media or in emails. No extra tools needed.
Finding your booking link
- Go to Settings and, in the Calendar group, open Booking link & widget.
- At the top is the Booking link & widget card with your Direct booking link.
- Click Copy and share the link anywhere you like.
You can put this link on your website, in your Instagram bio, on your Facebook page or in emails to clients.
Personalising your booking page
On the same page (Settings > Booking link & widget), below the booking link, you'll find two cards where you determine what your booking page looks like, with a live preview below the fields.
- Primary colour (Booking page colours card) - the accent colour for buttons and highlights. Choose a colour with the colour picker or type the hex code (for example
#ff4f00). - Background photo (Booking page card) - a full-width mood photo at the top of your booking page. Automatically resized and compressed; you don't need to optimise anything yourself.
- Salon name font - choose from nine fonts (sans-serif, serif or handwritten) for the heading with your salon name.
- Tagline - a short line under your salon name, for example your slogan (maximum 280 characters).
Your salon name and tagline always sit in a card below the photo, never overlapping the photo itself, so the text stays readable no matter which photo you choose. Your booking page logo (from the Logos card under Settings > Branding) appears rounded on the seam between photo and card.
Without a background photo, your booking page looks exactly the same as it does without these settings - the mood photo is entirely optional.
Since September 2026, the widget you embed on your own website shows exactly
the same header as your booking page: your mood photo, your logo, your salon
name and your tagline. There is no separate compact variant any more.
Visitors scroll through your treatments inside the widget; use data-height
to give it the height that suits your page (700 is a comfortable default).
Background photo, font and tagline are part of the Pro plan (EUR 59 per month). On a lower plan, you'll see the fields, but they're disabled with an upgrade hint. The primary colour is available on every plan. See Subscription & billing.
What your clients see
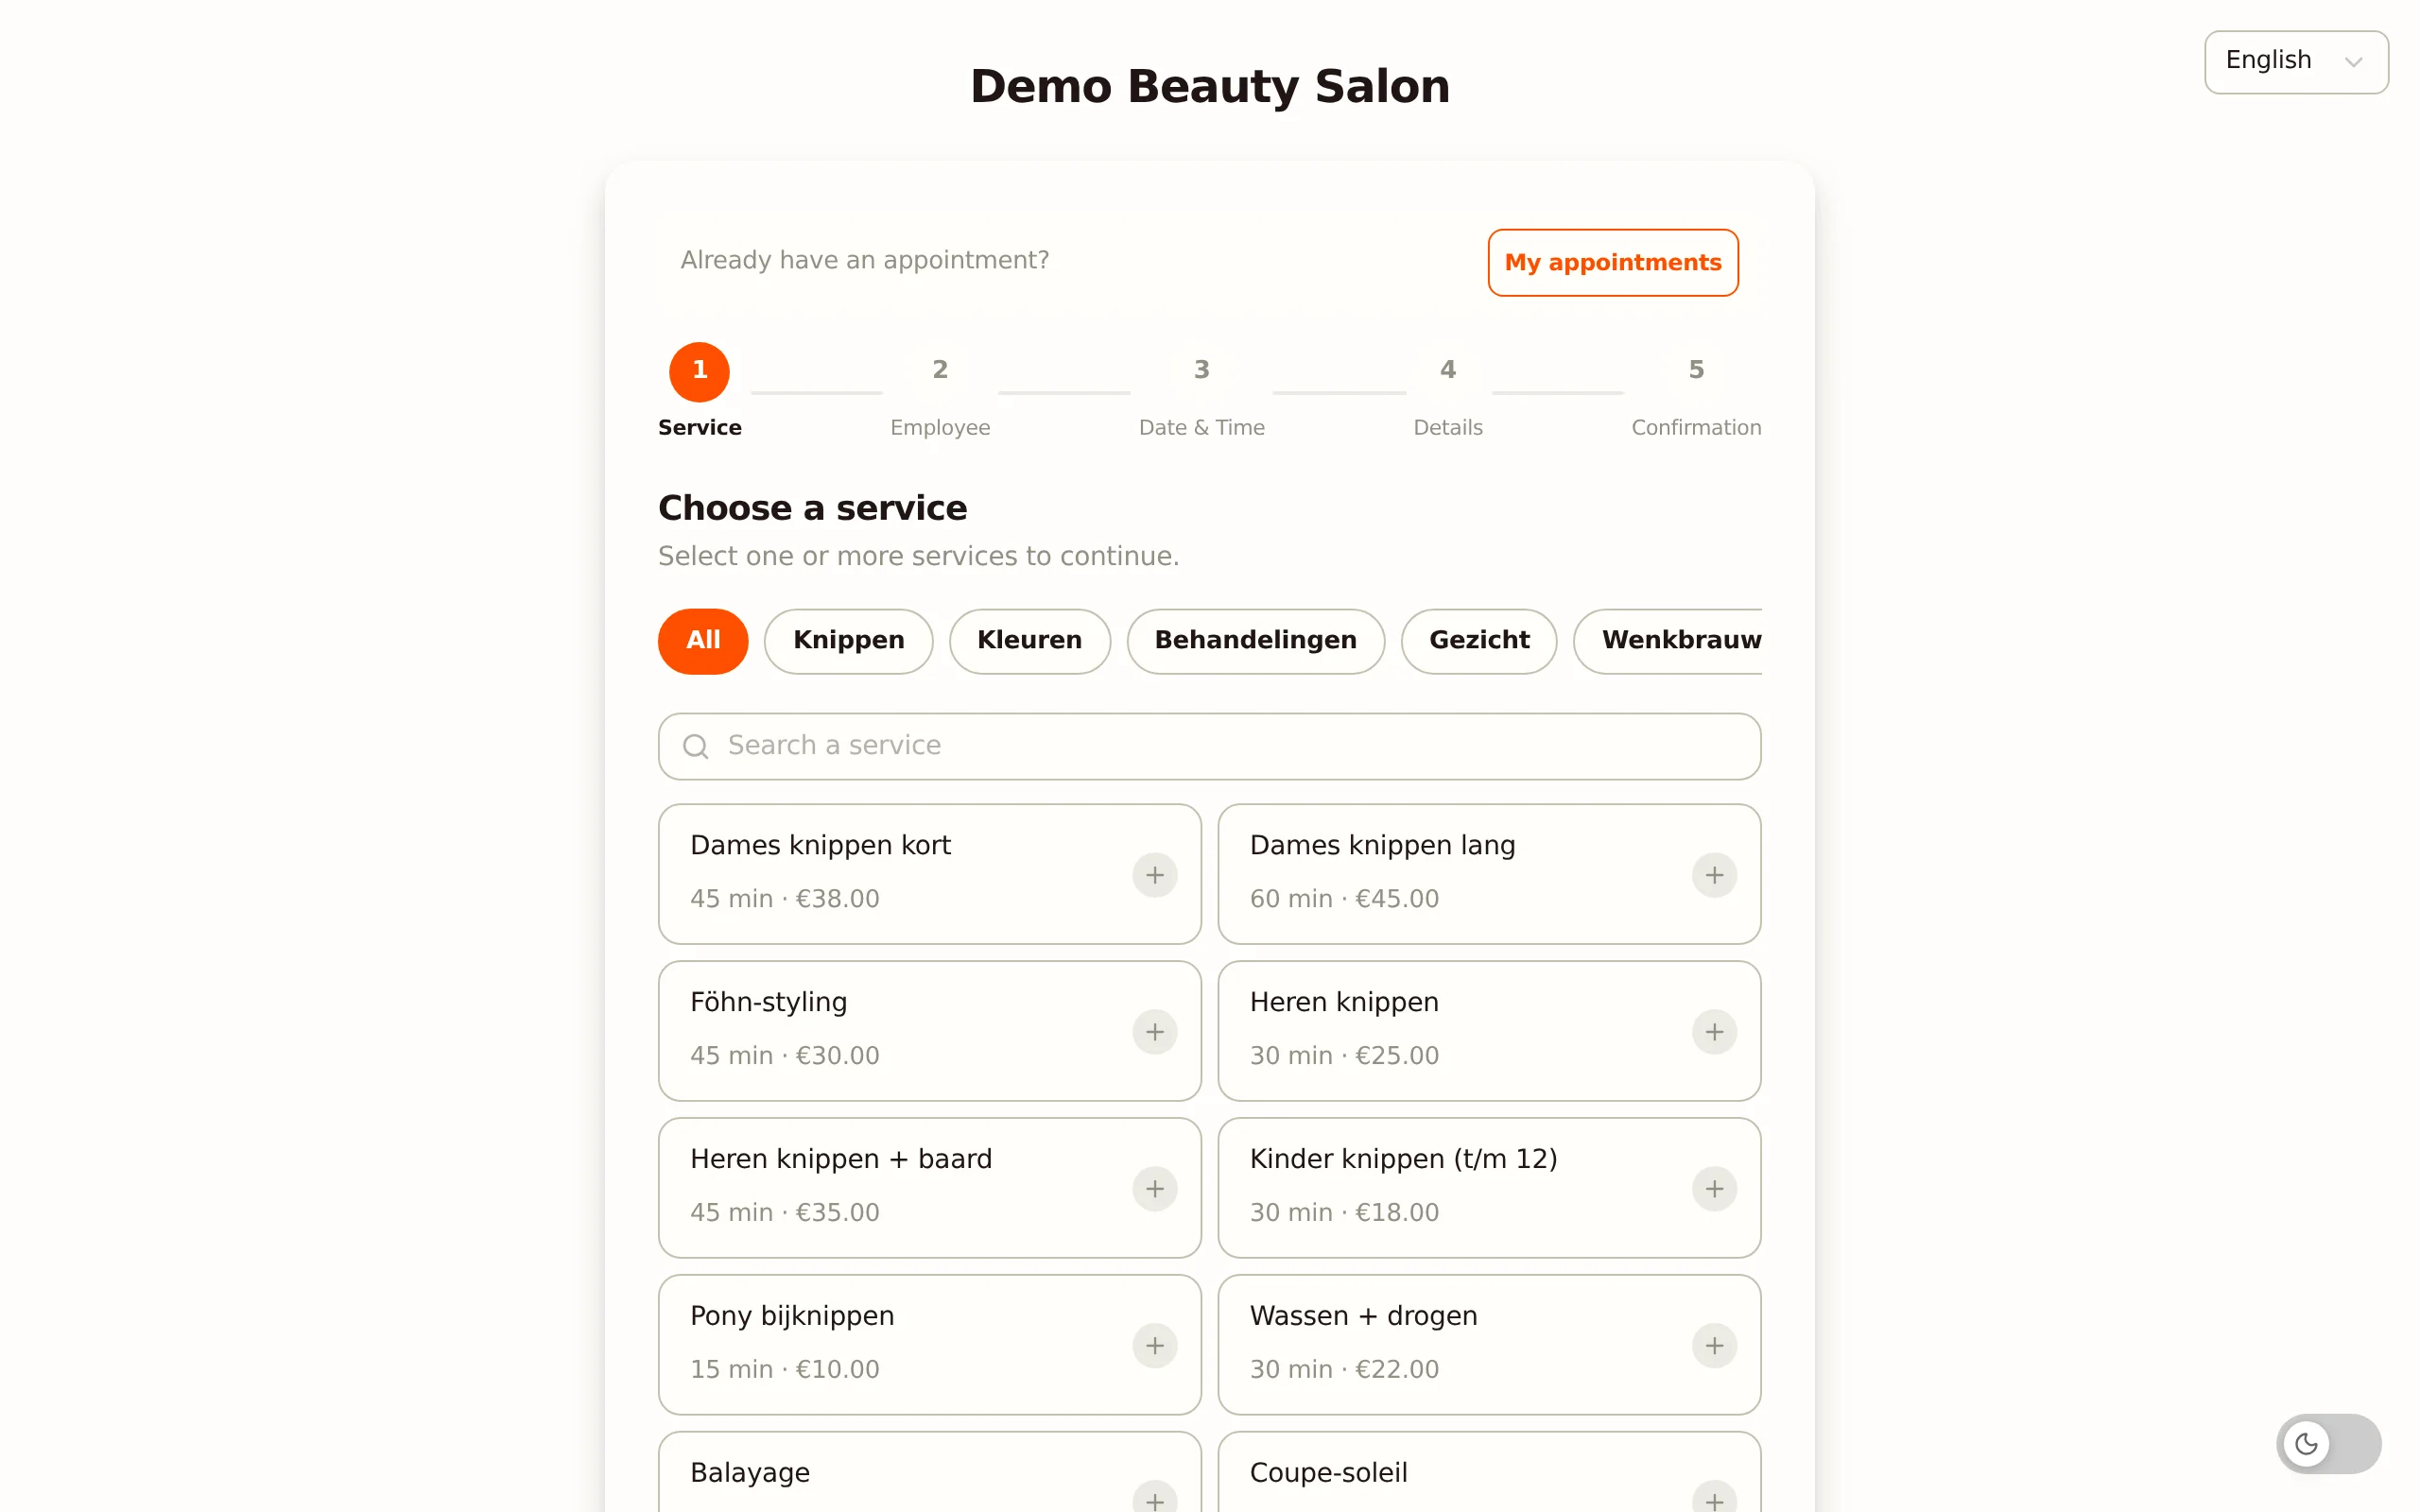
When someone visits your booking link, they go through a wizard with the following steps:
- Choose one or more services -- clients can combine multiple services in the same booking. A running total bar at the bottom shows the price and estimated duration.
- Choose a staff member -- this step only appears if you have enabled staff choice. Otherwise Salonnare automatically assigns the best available person and the step is skipped.
- Choose date and time -- only available slots are clickable, based on your calendar and the staff schedules.
- Enter details -- name, email, phone number. Optionally they can create an account here.
- Confirm -- they review the summary and confirm the appointment.
Does a service require two or more staff members at the same time (for example a four-hands massage) and have you enabled Client also chooses the extra staff member(s)? Then an extra step appears after choosing the date and time. The client sees who is available at that moment and picks a name, or "no preference" -- then Salonnare assigns someone automatically, just like before. If there is exactly one available staff member, that one is already preselected. If someone else books that staff member in the meantime, the client sees a message that the time slot is no longer available and can choose again.
There is no separate payment step in the wizard. What happens after Confirm depends on your settings:
- No deposit required -- the appointment is created immediately and the client sees the confirmation screen right away.
- Deposit required -- after confirming, the client is automatically redirected to a secure payment page (Mollie or Stripe). The appointment stays provisional until the deposit comes in. See Setting up deposits.
- Deposit required, but no payment provider connected -- the appointment is simply created, without a deposit, and the client sees the confirmation screen straight away. You get a notification about it in the notification center. See Without a connected payment provider.
The appointment appears in your calendar as soon as it is confirmed.
The booking page is responsive -- most clients book from their phone. Test the flow yourself on mobile before sharing it.
Adjusting your booking settings
You'll find these settings under Settings > Online booking (in the Calendar group).
Online booking on or off
Enable online booking decides whether clients can make an appointment themselves. When it is off, your booking page shows a message that your salon is not taking online appointments at the moment, and asks clients to contact you. Clients who already have an appointment can still view and cancel it under My appointments. This also applies to the booking widget on your own website.
Booking mode
- Directly confirmed -- Appointments are confirmed instantly. The client gets a confirmation and the booking goes straight into your calendar (unless a deposit is required; then the booking is only final after payment).
- Request -- Appointments need your approval first. The booking comes in as provisional and the client sees a message that the request has been received and is awaiting confirmation.
The Request mode is ideal if you want to review bookings before they are confirmed -- for example to check for scheduling conflicts or to assign the right staff member. No deposit is requested in request mode.
Allowed customers
- All customers -- Anyone with the link can book.
- Existing customers -- Only clients who already have an account can book. They must log in first.
Display options
- Show prices -- Choose whether prices are visible on the booking page.
- Show duration -- Choose whether the service duration is displayed.
- Allow staff selection -- Let clients choose their preferred staff member, or let Salonnare assign one automatically (the staff step is then skipped).
- Client also chooses the extra staff member(s) -- Only usable if Allow staff selection is also enabled; if it isn't, this toggle is greyed out and has no effect, not even via the API. When enabled, clients booking a service that needs two or more staff members at the same time can also choose the extra staff member(s) themselves, instead of Salonnare assigning them automatically.
Time restrictions
- Min. lead time -- Set the minimum number of hours before an appointment can be booked. Set this to 2 hours, for example, to prevent last-minute bookings.
- Max. advance booking -- How far into the future clients can book. For example, 60 days means they cannot book more than two months ahead.
Extra time for new clients
With Extra time new client (min) you automatically add extra minutes to an appointment of a new client, for example for an introduction or intake. This applies to online bookings and to appointments you book yourself in the salon. Nothing changes for existing clients.
That extra time and the transition after the appointment (Calendar settings) are shown striped at the bottom of the appointment in the calendar, just like an appointment you book in the salon. Online, only times in which the whole appointment fits are offered, extra time included: a first visit never runs into a break, time off or the next appointment. Because the client only enters their details after choosing a time, the booking page counts the extra time when showing the times, unless the client is logged in and has visited before.
Who counts as a new client? Someone without an earlier appointment or receipt in Salonnare. A client you imported (for example from Salonized) is never a first visit, even if their appointments from the previous system were not carried over. The same rule decides the First visit notice in the appointment editor.
When you book an appointment yourself for a client on their first visit, the appointment editor puts the extra time in the last transition row, labelled incl. ... min extra time for a first visit. It is shown striped in the calendar and no other appointment can be booked over it. If the extra time is not needed, shorten or remove the row: that only affects that one appointment. If you then pick a client who has visited before, the extra time disappears by itself. In a course of treatments only the first appointment gets the extra time, online and in the salon; the follow-up appointments only get the transition. A copy of an appointment is never a first visit, so it does not take the extra time along. When a client reschedules her first appointment online, she only sees times in which that appointment fits including the extra time. Appointments already in the calendar are not changed.
When a new client books online herself, the confirmation screen after booking shows the duration of her treatments plus the extra time, labelled incl. ... min extra time for a first visit. The step before only shows the treatment duration: whether it is a first visit is only settled when the booking is made. In the calendar, the appointment details mention the same extra time at the closing transition.
An appointment you book from the waitlist and a booking through Reserve with Google also get the extra time on a first visit, striped in the calendar. The start times the waitlist offers you count the whole appointment, extra time included. Google does not know who is booking, so the times shown there always include the extra time; a regular client sees at most one time slot less. Recurring appointments never get extra time: a regular client is no longer a first visit after the first time, and a series keeps exactly the time slot you set in the series.
Cancellation notice
With Cancellation notice you decide up to how many hours before the appointment a client may cancel or reschedule online herself under My appointments. You choose from No notice period (the default: online cancelling is possible until the appointment starts), 2, 4, 12, 24, 48 or 72 hours. Within that period the client can no longer change the appointment herself, and the booking page asks her to contact you.
The notice period applies to your whole salon. If a location has its own notice period, that one applies to appointments at that location.
Handling booking requests
If you use the Request booking mode:
- A new booking comes in and appears as provisional in your calendar. You also get a notification in the app.
- Your salon's email address receives an email with the booking details and two buttons: Bevestigen (confirm) and Weigeren (decline). This email is currently always in Dutch. You can switch it and the push notification on or off under Settings > Notifications (Booking requests card).
- Click Bevestigen to make the appointment final, or Weigeren to cancel it.
If you confirm or decline using the buttons in that email, Salonnare does not send the client a separate email about it. Let the client know yourself, especially when you decline.
Try to respond to booking requests quickly -- clients appreciate a fast reply, and waiting too long can mean they book elsewhere.
Login for existing clients
When "Existing customers" is enabled, clients see a login screen before they can book. They can log in with:
- Email and password -- If they have created an account.
- Magic link -- A passwordless option where they receive a login link by email.
- Forgot password -- Below the password field there is a "Forgot your password?" link. The client then receives an email with a link to choose a new password; that link is valid for one hour and works once. The email is in your salon's language and carries your brand colour. The link in it points to your own domain if you have set it up and verified it, otherwise to your Salonnare subdomain.
The on-screen response is always the same, even for an address you do not have on file. That way nobody can use the form to find out who your clients are. We deliberately do not keep the content of that email in the client's mail history: it contains a working link.
My appointments: changing or cancelling on their own
A client who is logged in on your booking page (via Already have an appointment? at the top) sees her upcoming appointments under My appointments. Each appointment has two buttons:
- Edit -- pick a new date and time. The appointment keeps the same treatment, staff member and duration. If someone else has booked the chosen time in the meantime, the client sees the message that the time slot is no longer available and picks another time. The new time has to fit just like a new booking: the staff member is working then, it does not fall in a break, time off or a closing day, and it lies within your booking window and within the times the treatment can be booked. The whole appointment counts, including the transition and any extra time for a first visit. If the staff member is not working at that moment, the client sees "The staff member is not available at this time (outside working hours, on a break or off). Please choose another time."
- Cancel -- call the appointment off, after a confirmation question.
Changing or cancelling on their own only works for an appointment that is still open (Scheduled or Provisional) and lies in the future:
- An appointment that has already been completed, or that is marked as a no-show, can no longer be changed online. The client then sees "This appointment has already been completed and can no longer be changed online."
- An appointment in the past can't either: "An appointment in the past can no longer be changed online."
- If you have set a cancellation notice (or the location of the appointment has its own notice period), the client can no longer cancel or reschedule online within that period. She then sees, for example, "Online cancelling or rescheduling is possible up to 24 hours before the appointment. Please contact the salon." A period of 0 hours means online cancelling is always possible.
In all of these cases the appointment stays as it is. If the client still wants to change something, she contacts you and you adjust the appointment in the calendar.
Embedding on your website
Want to add bookings directly to your website? In the Booking link & widget card under Settings > Booking link & widget, you will find ready-made code snippets for:
- Floating button -- A booking button that appears in the corner of your website.
- Inline widget -- Embed the booking form directly into a page.
- Booking button -- A ready-made button wherever you place it. By default it opens your booking page in an overlay, so visitors stay on your own site. Use
data-target="tab"to open it in a new tab, anddata-textto choose the wording. - Direct link HTML -- A simple link to your full booking page. You style it yourself.
Copy the code and paste it into your website.
Want to know more about managing incoming appointments? See Managing appointments.