Customizing Email Templates
Salonnare automatically sends emails to your clients: a confirmation after a booking, a reminder before the appointment, a review request afterwards, and more. Every template has a polished default, but you can fully tailor the subject and content to your own brand -- per language.
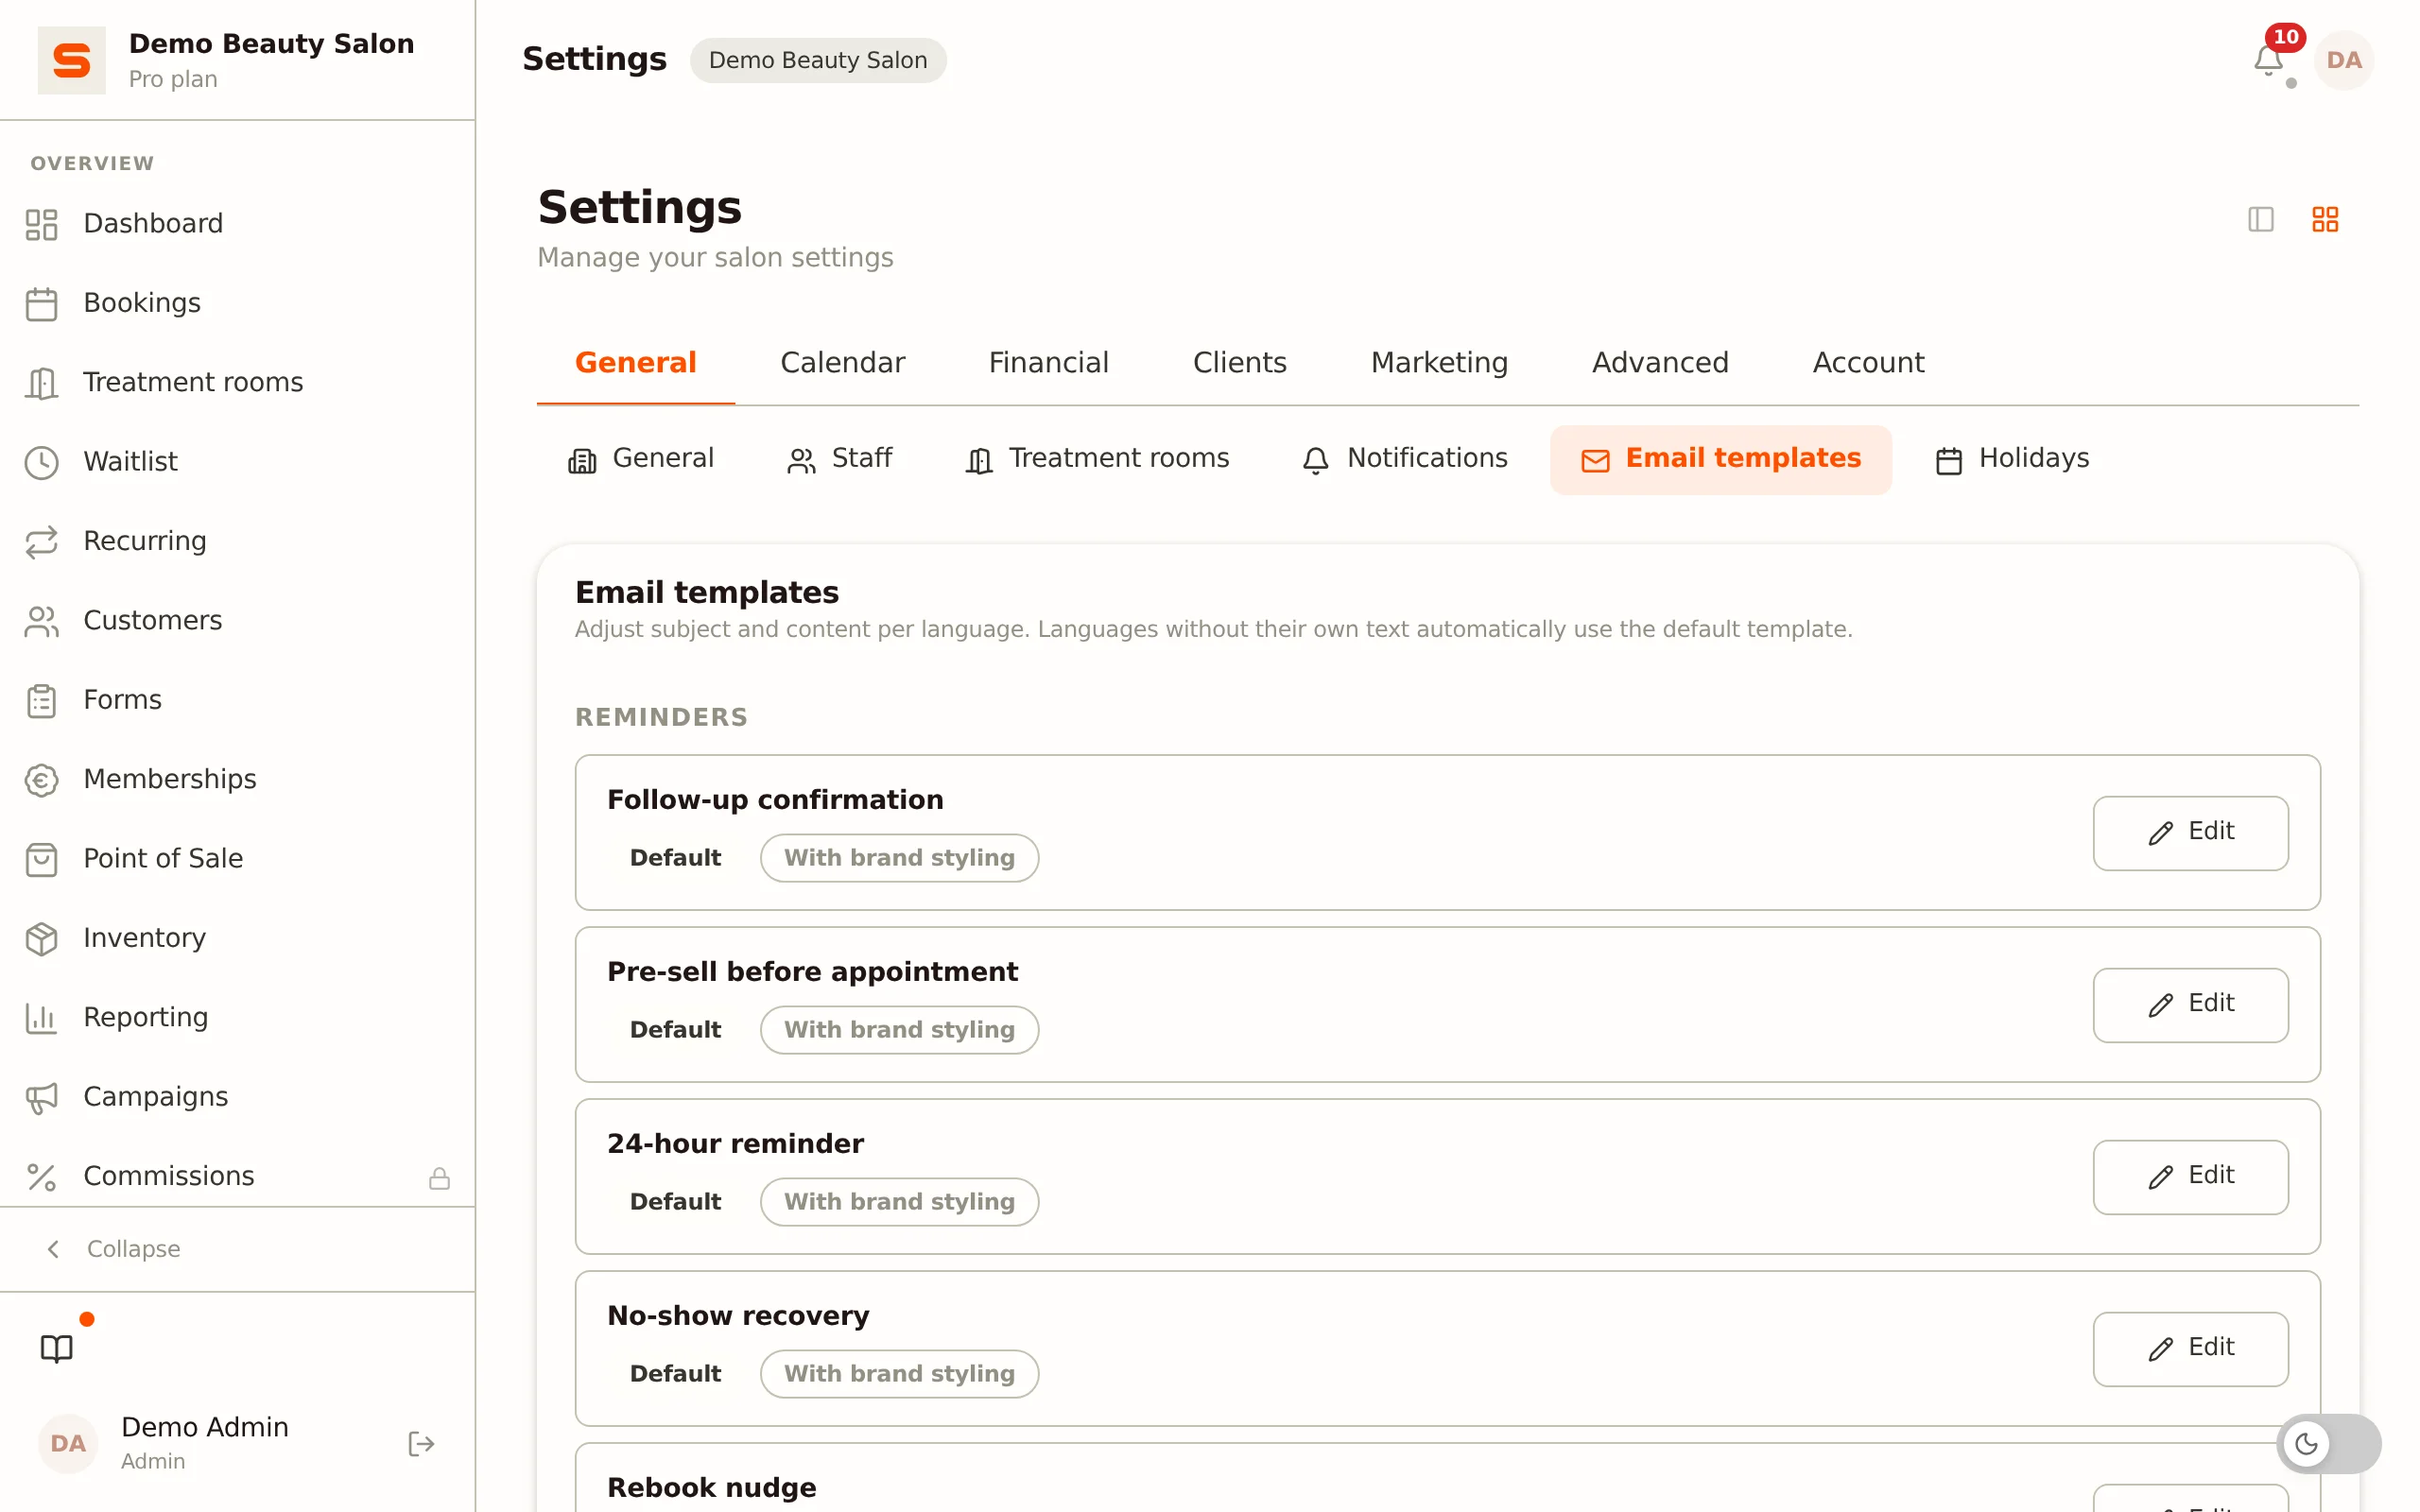
Opening the overview
-
Go to Settings in the sidebar.
-
Open the Email templates section.
-
You'll see all templates, grouped by category:
- Reminders -- follow-up emails around the appointment (24 hours before, rebook nudge).
- Booking -- confirmation, change and cancellation of an appointment.
- No-show -- recovery email, fee email and the confirmation that the fee was received, for a missed appointment, grouped together so you see them side by side.
- Payments -- deposit, payment confirmation, receipt and payment link.
- Memberships -- payment, a reminder after a failed payment, and the email about a membership that is about to end (Membership renewal).
- Marketing -- new client welcome, birthday, thank-you after the visit, review request, rebook reminder, gift card, waitlist and intake invite.
Each template carries two labels:
- Customised or Default -- whether you've customized this template (in at least one language).
- With brand styling or Free-form layout -- whether the template is wrapped in your brand template (logo, colors) or has its own free design.
- Next to each template's name is an (i) icon. Click it for a short explanation of exactly when that email is sent.
- On the right of the row you find the switch for on and off, the Settings button (timing, explanation and exceptions per email) and the Edit button. If you've customized the template, Reset to default appears there as well.
Switching an email on or off
Every row has a switch on the right. It decides whether Salonnare sends that email to your clients -- you don't have to open the template for it.
- The switch saves immediately. There is no save button and nothing is queued: switch an email off and sending stops right away.
- If saving fails, the switch jumps back to its previous position and the message Change not saved appears. What you see on screen therefore always matches what is stored.
- When an email is off, the name and the labels on the left turn semi-transparent. The buttons stay at full strength: you can still prepare the text of an email that is switched off.
When the switch is locked
If an email is not part of your plan, the switch is locked and carries a padlock. Below it you read This email is not part of your plan. with the link View your subscription. You can only flip it once your subscription includes that feature.
When the feature itself is off
This is something different: the email is in your plan, but the feature it belongs to is switched off -- Deposits or No-show fee, for example. The switch stays usable, so you can turn the email on in advance. Below it you read This switch only controls the email, not the feature itself., followed by The email is only sent once you switch this feature on: and a link to the section where that feature lives.
The difference matters. Locked is about your subscription; the feature is off is about a setting you can switch on yourself. The switch in Email templates never turns that feature on or off -- it only controls the email.
Where these switches moved from
Until recently they were scattered across six different settings sections. They now all live in Email templates:
| Before | Now |
|---|---|
| Notifications > "Reminder sequence" card (24-hour reminder, rebook nudge, including the hours and days) | Email templates > the matching row > Settings |
| Notifications > Email notifications > the no-show email | Email templates > No-show fee required |
| Client settings > welcome email for new clients | Email templates > New client welcome |
| Reviews > review request email and the delay in hours | Email templates > Review request (the delay has been dropped -- see below) |
| Deposits > the deposit email | Email templates > Deposit required and Deposit received |
| No-show fee > the email switch | Email templates > No-show fee required and No-show fee received |
| Payment connect > receipt by email | Email templates > Receipt |
Two switches used to drive two emails at once. Those are separate now: Deposit required sits next to Deposit received, and No-show fee required next to No-show fee received. Your existing setting was carried over one-to-one during the move -- so nothing changed until you flip something yourself.
Settings per email
Click Settings in a row and a dialog opens with everything about that one email. The layout is the same for every email, from top to bottom:
- When does this email go out? -- a sentence about the moment it is sent.
- Heads up -- a red box, only on the emails where switching off does more than hold the message back.
- Send this email -- the same switch as in the row.
- A number field for the timing -- only on the two emails that pick their own moment.
- Even with this email switched on, it is not sent to: -- the clients who skip it anyway. This is an explanation, not a setting: those preferences live per client on the client card.
- The line about your plan or about the feature, if either applies.
- Want to change the content or subject? Use Edit in the list.
At the bottom of the dialog you find Save and Cancel.
Cancel changes nothing -- not even if you just flipped the switch inside the dialog. To keep that change, click Save. The switch in the row itself behaves differently: that one saves straight away.
Timing: two emails pick their own moment
| Template | Field | From -- to | Default |
|---|---|---|---|
| 24-hour reminder | How many hours before the appointment | 1 -- 168 hours | 24 |
| Rebook nudge | How many days after the appointment | 1 -- 365 days | 30 |
The other emails have no time field -- they hang on an event (a booking, a payment, a birthday) and go out as it happens.
The Review request had a field here until recently too: the delay in hours. That field is gone. That message now goes out the morning after the appointment, at 09:00 in your salon's time zone. There are two exceptions: if you set an appointment to completed in the calendar yourself without checking it out in the POS, the request goes out right away; if you link a receipt to an appointment afterwards, no request goes out. See Client Reviews.
Rebook nudge: its own rhythm per treatment type
The Rebook nudge -- the "coming back soon?" email -- has one general interval for all of your clients. That rarely fits everywhere: lash extensions want a refill every three to four weeks, a haircut more like every six to eight.
That is why you can create groups. A group is a set of treatments with its own interval in days. You can make as many as you like.
You find them under Settings > Email templates > the Rebook nudge row > Settings.
Per group you set:
- A name you recognise yourself: "Lashes", "Haircuts", "Nails".
- The treatments that belong to it.
- The interval in days after which the email should go out.
- A toggle to switch the group off without deleting it.
The rules
- Treatments without a group keep the general interval. The groups are an addition: if you create none, nothing changes about what you have now.
- A treatment belongs to at most one group. Try to put it in a second group and Salonnare refuses, with a message naming the treatments involved. A group is an interval, so two groups would give two answers to the same question.
- The last three completed appointments decide which group a client falls into. The group that appears most often wins. One outing therefore does not change the rhythm (one against two); two visits in a row for something new does -- exactly the moment you would say yourself that the client has switched.
- On a tie, the group of the most recent visit wins.
- The interval counts from the last appointment IN that group, not from the last appointment overall. If your lash client dropped in for a colour in between, her lashes still need topping up after 21 days and the email goes out then.
- One message at a time per client. If a client qualifies for two groups, she gets one -- not two emails.
- A switched-off group counts nowhere. Its treatments fall back on the general interval; you do not lose the group or its treatments.
The text of this email is still set per salon, not per group: you do that with Edit on the same row. Only the rhythm differs per group.
Membership renewal
In the Memberships group you'll find the row Membership renewal. This is the email to a client whose membership has been cancelled at the end of the period and is about to end. It invites the client to get in touch with you if she wants to renew.
- The email goes out seven days and three days before the membership ends, so twice per ending membership.
- A membership that simply continues does not get this email.
- The switch is on by default. Switch it off if you don't want to remind clients that their membership is ending.
- It has no timing field: the moment is fixed.
See Salon Memberships.
Thank-you after visit and rebook reminder
Two emails belong to the Follow-up sequences feature (Settings > Features). That feature is off by default; while it is off, neither email is sent, even if the switch on the row is on.
- Thank-you after visit -- goes to the client one day after a completed appointment. It does not matter whether you completed the appointment in the calendar or through the checkout.
- Rebook reminder -- goes after the number of days set as visit frequency (under Features), as an invitation to book again.
Each email has its own switch in the list, so you can send the thank-you without the reminder, or the other way round. You change the subject and content with Edit, just like the other emails.
When they are NOT sent:
- Not to clients who do not want reminders or whose reminders are temporarily paused (client card).
- The rebook reminder not when the client already has a new appointment, and not when the Rebook nudge is on: asking "coming back soon?" twice is once too many.
- Nothing more than three days late, and nothing for an appointment you complete more than three days after it ended. A thank-you for a visit weeks ago reads like a mistake.
The review request is not part of this. It is a separate email with its own switch (Review request) and always goes the morning after the appointment at 09:00. See Client reviews.
The warnings in the red box
Six warnings, spread over eight emails. On these, switching off does more than just hold the message back:
- Right after booking, Appointment updated and Appointment cancelled: "Your client then hears nothing at all about their appointment - no confirmation, no change, no cancellation. You as the salon still get your own notification."
- Deposit required: "Without this email the client gets no payment link. The appointment stays pending and is cancelled automatically after the deadline."
- No-show fee required: "If this email is off, no payment request is sent after a no-show and nothing is charged: not automatically, and not when you mark an appointment as a no-show yourself. That also applies to a card the client saved in advance."
- Gift card: "The gift card is still created; you pass the code to the client yourself."
- Intake invitation: "Clients will no longer fill in the intake form beforehand."
- Payment link: "The button to email a payment link disappears from the register."
Who still does not get the email
Under Even with this email switched on, it is not sent to: the dialog lists who skips this particular email:
- On 24-hour reminder, Rebook nudge and No-show recovery: "Clients who do not want to receive reminders." and "Clients whose reminders are temporarily paused."
- On Review request: "Clients who do not want to receive review requests."
- On Receipt: "The preference on the client card wins: set to 'always send', the receipt goes out even when this switch is off."
- On every email, always at the bottom: "Addresses that bounced, complained or unsubscribed, and clients who temporarily receive no email after a failed delivery."
You don't set these exceptions here: they live per client on the client card.
On a phone or tablet the name, the switch and the buttons stack underneath each other. The switch, Settings and Reset to default all work there; only Edit -- the visual editor -- needs a bigger screen. The app says so too: "You edit the content of an email on a larger screen. Switching on or off, the timing and the settings all work here."
Editing a template
- Click Edit on the template you want to change.
- The template opens in a full-screen editor.
- Pick the language at the top (NL, EN, DE, FR, ES). You edit each language separately.
- Adjust the Subject in the text field at the top.
- Edit the content in the visual editor: drag blocks, type text and set formatting -- no code knowledge required.
- Click Save.
Languages you don't customize automatically use the default template. So you don't need to edit all five languages -- only the ones you actually use.
Inserting merge tags
Merge tags are placeholders that are automatically filled in with the real details of the client and the appointment when the email is sent. Above the editor they appear as clickable chips -- click one to insert it at the cursor position.
Commonly used tags:
{{clientName}}-- the client's name{{salonName}}-- your salon's name{{date}},{{startTime}},{{endTime}}-- date and time of the appointment{{serviceName}},{{serviceDuration}},{{servicePrice}}-- the booked service{{staffName}}-- the staff member{{behandelingen}}-- a multi-line list of all booked services (not one of the chips; type it into the text yourself){{notes}}-- the note on the appointment{{amount}},{{paymentMethod}}-- amount and payment method (in payment emails){{reviewUrl}},{{paymentUrl}},{{bookingUrl}}-- links to review, payment or online booking
Which tags make sense depends on the template: use {{amount}} only in a payment email, {{reviewUrl}} only in the review request, and so on.
CTA button: setting the link
If you drag the CTA button onto the canvas, you can set where the button links to. Select the button and open the settings panel (gear icon):
- Choose Booking page to link to your public online booking page.
- Choose Salon website to link to your own website (only available if you've set a salon website in your business details).
- Choose Custom link to type in your own full URL.
The default choice is the booking page -- the most commonly used link in a CTA button. In a campaign (bulk email), both default choices automatically resolve to the correct URL at send time, just like in system templates.
Brand styling: logo and colors
Templates labeled With brand styling are wrapped in your brand template, so your logo and accent color come along automatically. You set those brand settings (logo, accent color, button color) centrally under Settings > Branding -- the templates pick them up, so you don't have to set them per email.
Previewing
- Click Preview at the top right.
- A panel slides open with the rendered email, filled with sample data so you can see merge tags actually working.
- Switch between the two views with the two icon buttons at the top right of the panel (a monitor for desktop, a phone for mobile). The mobile view shows the email at phone width.
Reverting to the default
Want to undo your changes?
- In the editor, Reset to default resets the language version you're currently editing.
- In the overview, Reset to default on a template resets all language versions of that template at once.
Resetting cannot be undone. Your customized text is lost and the template falls back to the default.
Related topics
- Notifications -- push notifications, the emails to you and your team, and the notification center in the app.
- Campaigns -- one-off newsletters and promotions to your clients.