Cures
A cure is the same treatment repeated several times, at a single cure price that may be lower than the individual prices added up. When booking, the client picks all the moments straight away, so the whole series lands in your calendar in one go.
Setting up a cure
- Go to Services & Products > Services and open the treatment.
- Turn on Offer as a course.
- Under Course options, add a row per cure option with Add course option:
- Number of sessions -- how many sessions the cure includes (2 to 12).
- Course price -- the total price. Pre-filled as the single price x the count, but you may lower it.
- The payment timing -- choose Pay everything upfront or Pay per session.
- Description -- optional. Clients see this text next to the option on your booking page.
- Click Save.
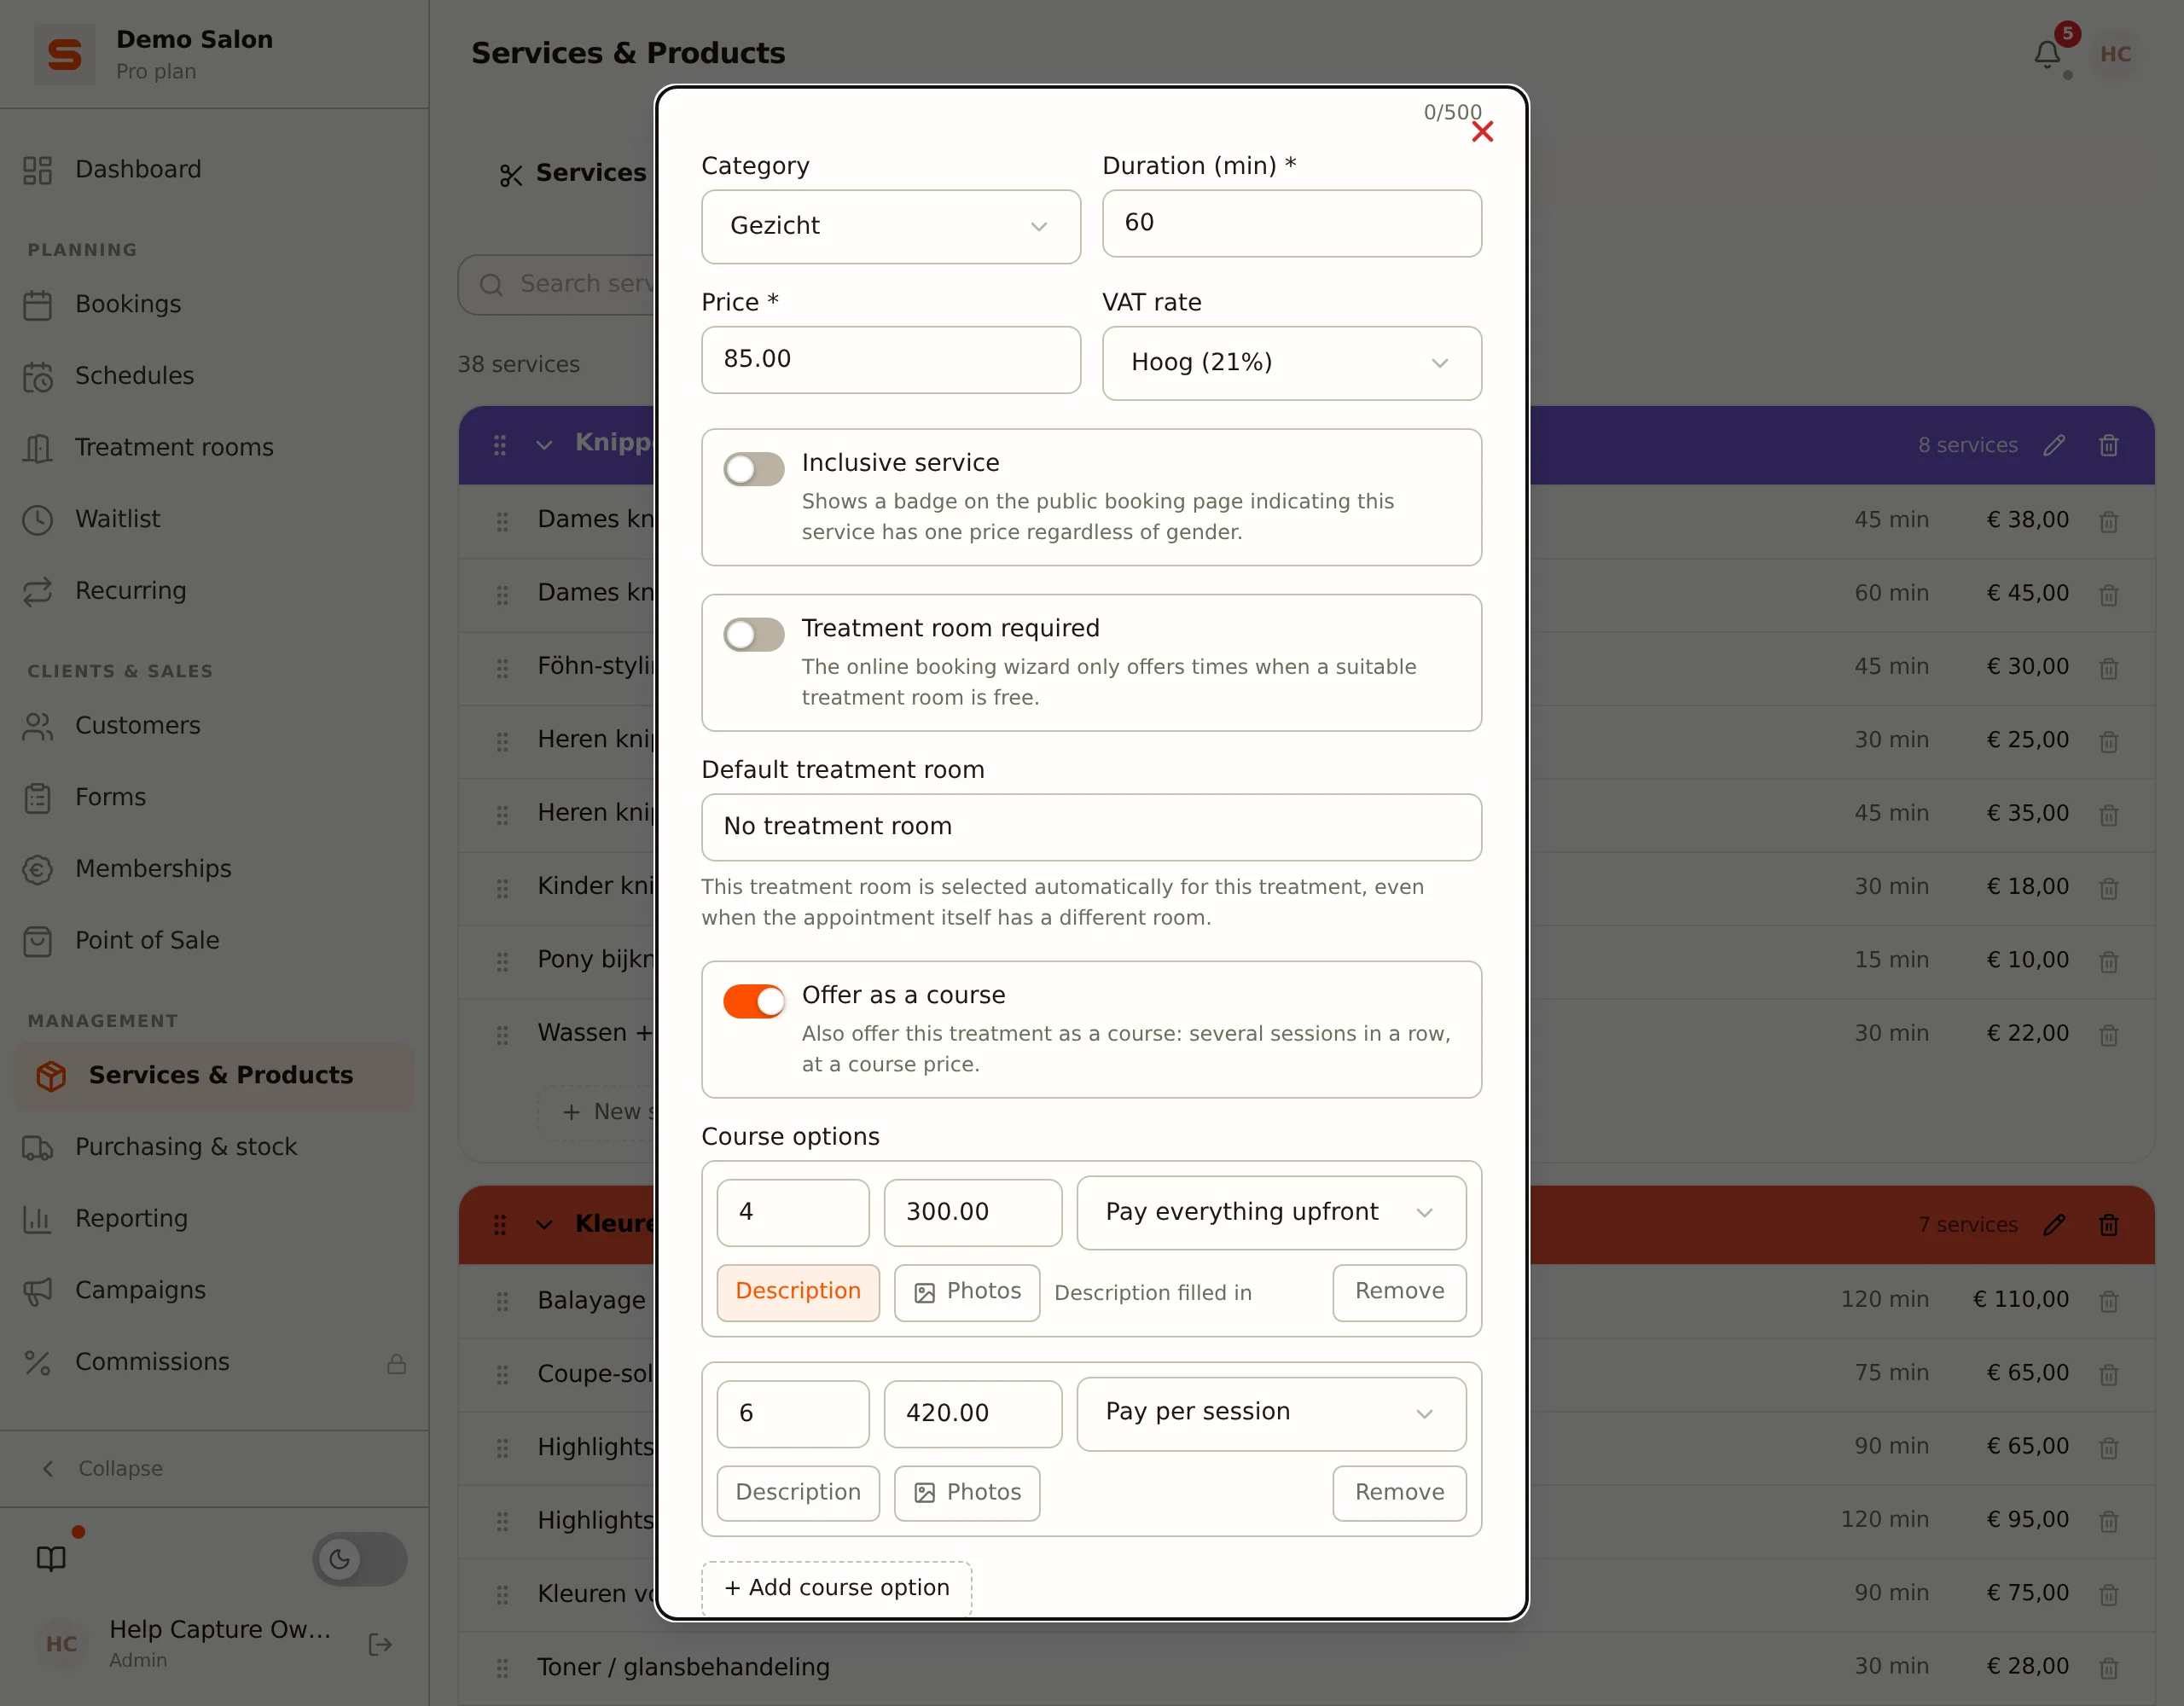
You can offer several options side by side on the same treatment, for example a 4x and a 6x cure.
Photos for a cure
Next to the description, every cure row has a Photos button. Use it to add up to three photos to that one cure option, for example a before-and-after of the whole series. The button lights up as soon as there are photos and shows how many.
Two things to know:
- Uploading and deleting are final right away. Unlike the description, photos are saved immediately, so there is no Cancel - only a button to close the window.
- The photos survive saving the service. They belong to the combination of treatment + number of sessions, not to the cure row itself. That is why you can add them to a cure row you have not saved yet. Only for a brand-new treatment do you have to save it once first, because without an existing service there is nothing to attach the photos to.
If you delete a cure row, or change its number of sessions, the photos of the old option are cleaned up when you save.
What your client sees
A treatment with cures shows the badge Cure available on the booking page. When the client clicks it, a small menu appears: Book once or one of the cure options.
If you filled in a description for an option, an info icon appears next to it. If you added photos, an image icon appears beside that; clicking it opens the photos full size. The menu stays open in the meantime, so the client can pick their cure right after looking.
If the client picks a cure, they then set all the moments: first moment 1, then moment 2, and so on. The top always shows "Moment 3 of 6". They can go back to an earlier moment with Previous moment; the choices already made stay in place.
A cure cannot be combined with other, individual treatments in the same booking.
Team member
The client picks one team member for the entire cure, or No preference. With no preference, we look for a single team member who is available for all selected moments and put the entire series on that person. If nobody can cover every moment, the cure is not booked and we ask the client to pick other moments or choose a team member themselves.
Paying
- Pay everything upfront -- the client gets a single payment link for the whole cure. All sessions are provisional until that payment comes in; after that they are confirmed in one go. If payment is not made in time, the entire cure lapses and all the time slots become free again.
- Pay per session -- every session gets its own payment link for an equal share of the cure price. That link only arrives when the session comes up, not all at once at booking time.
The payment window is the same one as for your deposits: you set it under Settings > Deposits with Deposit deadline and Number of hours. So there is no separate cure setting. See Setting up deposits.
Approving requests
If your booking page is set to Request instead of confirming directly, you can offer cures as normal. You approve or decline each session separately, using the buttons in the email you receive per session. That is safe: the payment link for a session only arrives as that session approaches, so a declined session has not been paid for yet.
Selling a cure at the desk
Create a new appointment in the calendar, pick the client and the treatment, and then choose the option you want under Cure. A Follow-up appointments block appears where you fill in the dates and times of session 2 up to N. Session 1 is the date and time you already picked at the top. Same time every week fills in the series in one click.
When you click Save, the whole cure is scheduled in one go. If one of the moments clashes with an existing appointment, nothing is scheduled and you see which moment is the problem - so you never end up with a half-scheduled cure.
Cancelling a session or a whole cure
When you cancel an appointment that belongs to a cure, we ask what you mean:
- Only this session -- just that one moment lapses, the rest stays.
- The whole cure -- all sessions that are not yet completed lapse.
Note: a cancelled session does not come back as credit. There is no punch-card administration; if you want to compensate the client, you do that yourself (for example with a gift card or a manual discount). To refund a cure that has already been paid, use the course voucher; see below.
Course voucher: print, email and refund
In the calendar, open an appointment that belongs to a cure and click Course voucher. You see in one overview:
- the cure price, what has been paid and what is still to pay;
- anything that has already been refunded;
- how many sessions the client has had and how many are still scheduled.
Print gives you the course voucher on paper, and Email to the client sends it to the email address on the client card. Emailing requires the permission to edit the calendar, and the client needs an email address.
Refunding a cure
If a client stops halfway, you refund the part that has not been used. Salonnare works this out itself: the completed sessions are charged in proportion to the cure price, and the rest of what the client paid goes back. Example: a cure of 4 sessions for €200, fully paid, with 1 completed session, refunds €150.
- Open the Course voucher.
- Under How does the money go back?, choose Refund to the online payment (only if the cure was paid online) or Cash, or manually via the card terminal.
- Click Refund.
The completed sessions stay as they are. The cure and the sessions still scheduled are cancelled and the client is notified. Anyone with the POS permission set to View + edit can refund. If there is nothing left to refund, because everything has been used or already returned, the button is not shown.
If the refund at the payment service fails, the refund is still recorded and the cure cancelled. Refund the amount yourself in the dashboard of that payment service.
Where do you see the cure?
- In the calendar -- open an appointment and you see "Cure: session 2 of 4" plus all the dates of the series under All sessions of this cure.
- On the receipt -- the treatment line states which session it is.
- In the emails -- the confirmation, the reminder and the payment link email all state "Session 2 of 4".