Point of Sale
The POS (point of sale) is your digital cash register. After a client's appointment, this is where you check out the services and products, apply any discounts and process the payment. It is designed to be fast and simple -- a few taps and you are done.
Processing a sale
Here is how to check out a client step by step:
- Open the POS -- click Point of Sale in the sidebar.
- Select a client -- just type to search. Linking a client is needed for store credit, loyalty points and an email receipt.
- Add treatments -- click the treatment(s) performed. For an appointment with multiple treatments they appear automatically as separate lines on the receipt -- you do not need to tap them again.
- Add products -- if the client also buys products. Use the Scan button for the barcode if needed.
- Apply discounts -- a discount you give yourself, a discount code or a gift card (see below).
- Apply store credit -- if the client has credit, deduct it from the total.
- Choose a payment method -- cash, card or online.
- Click Check out -- the sale is recorded and the client receives an email receipt (if enabled).
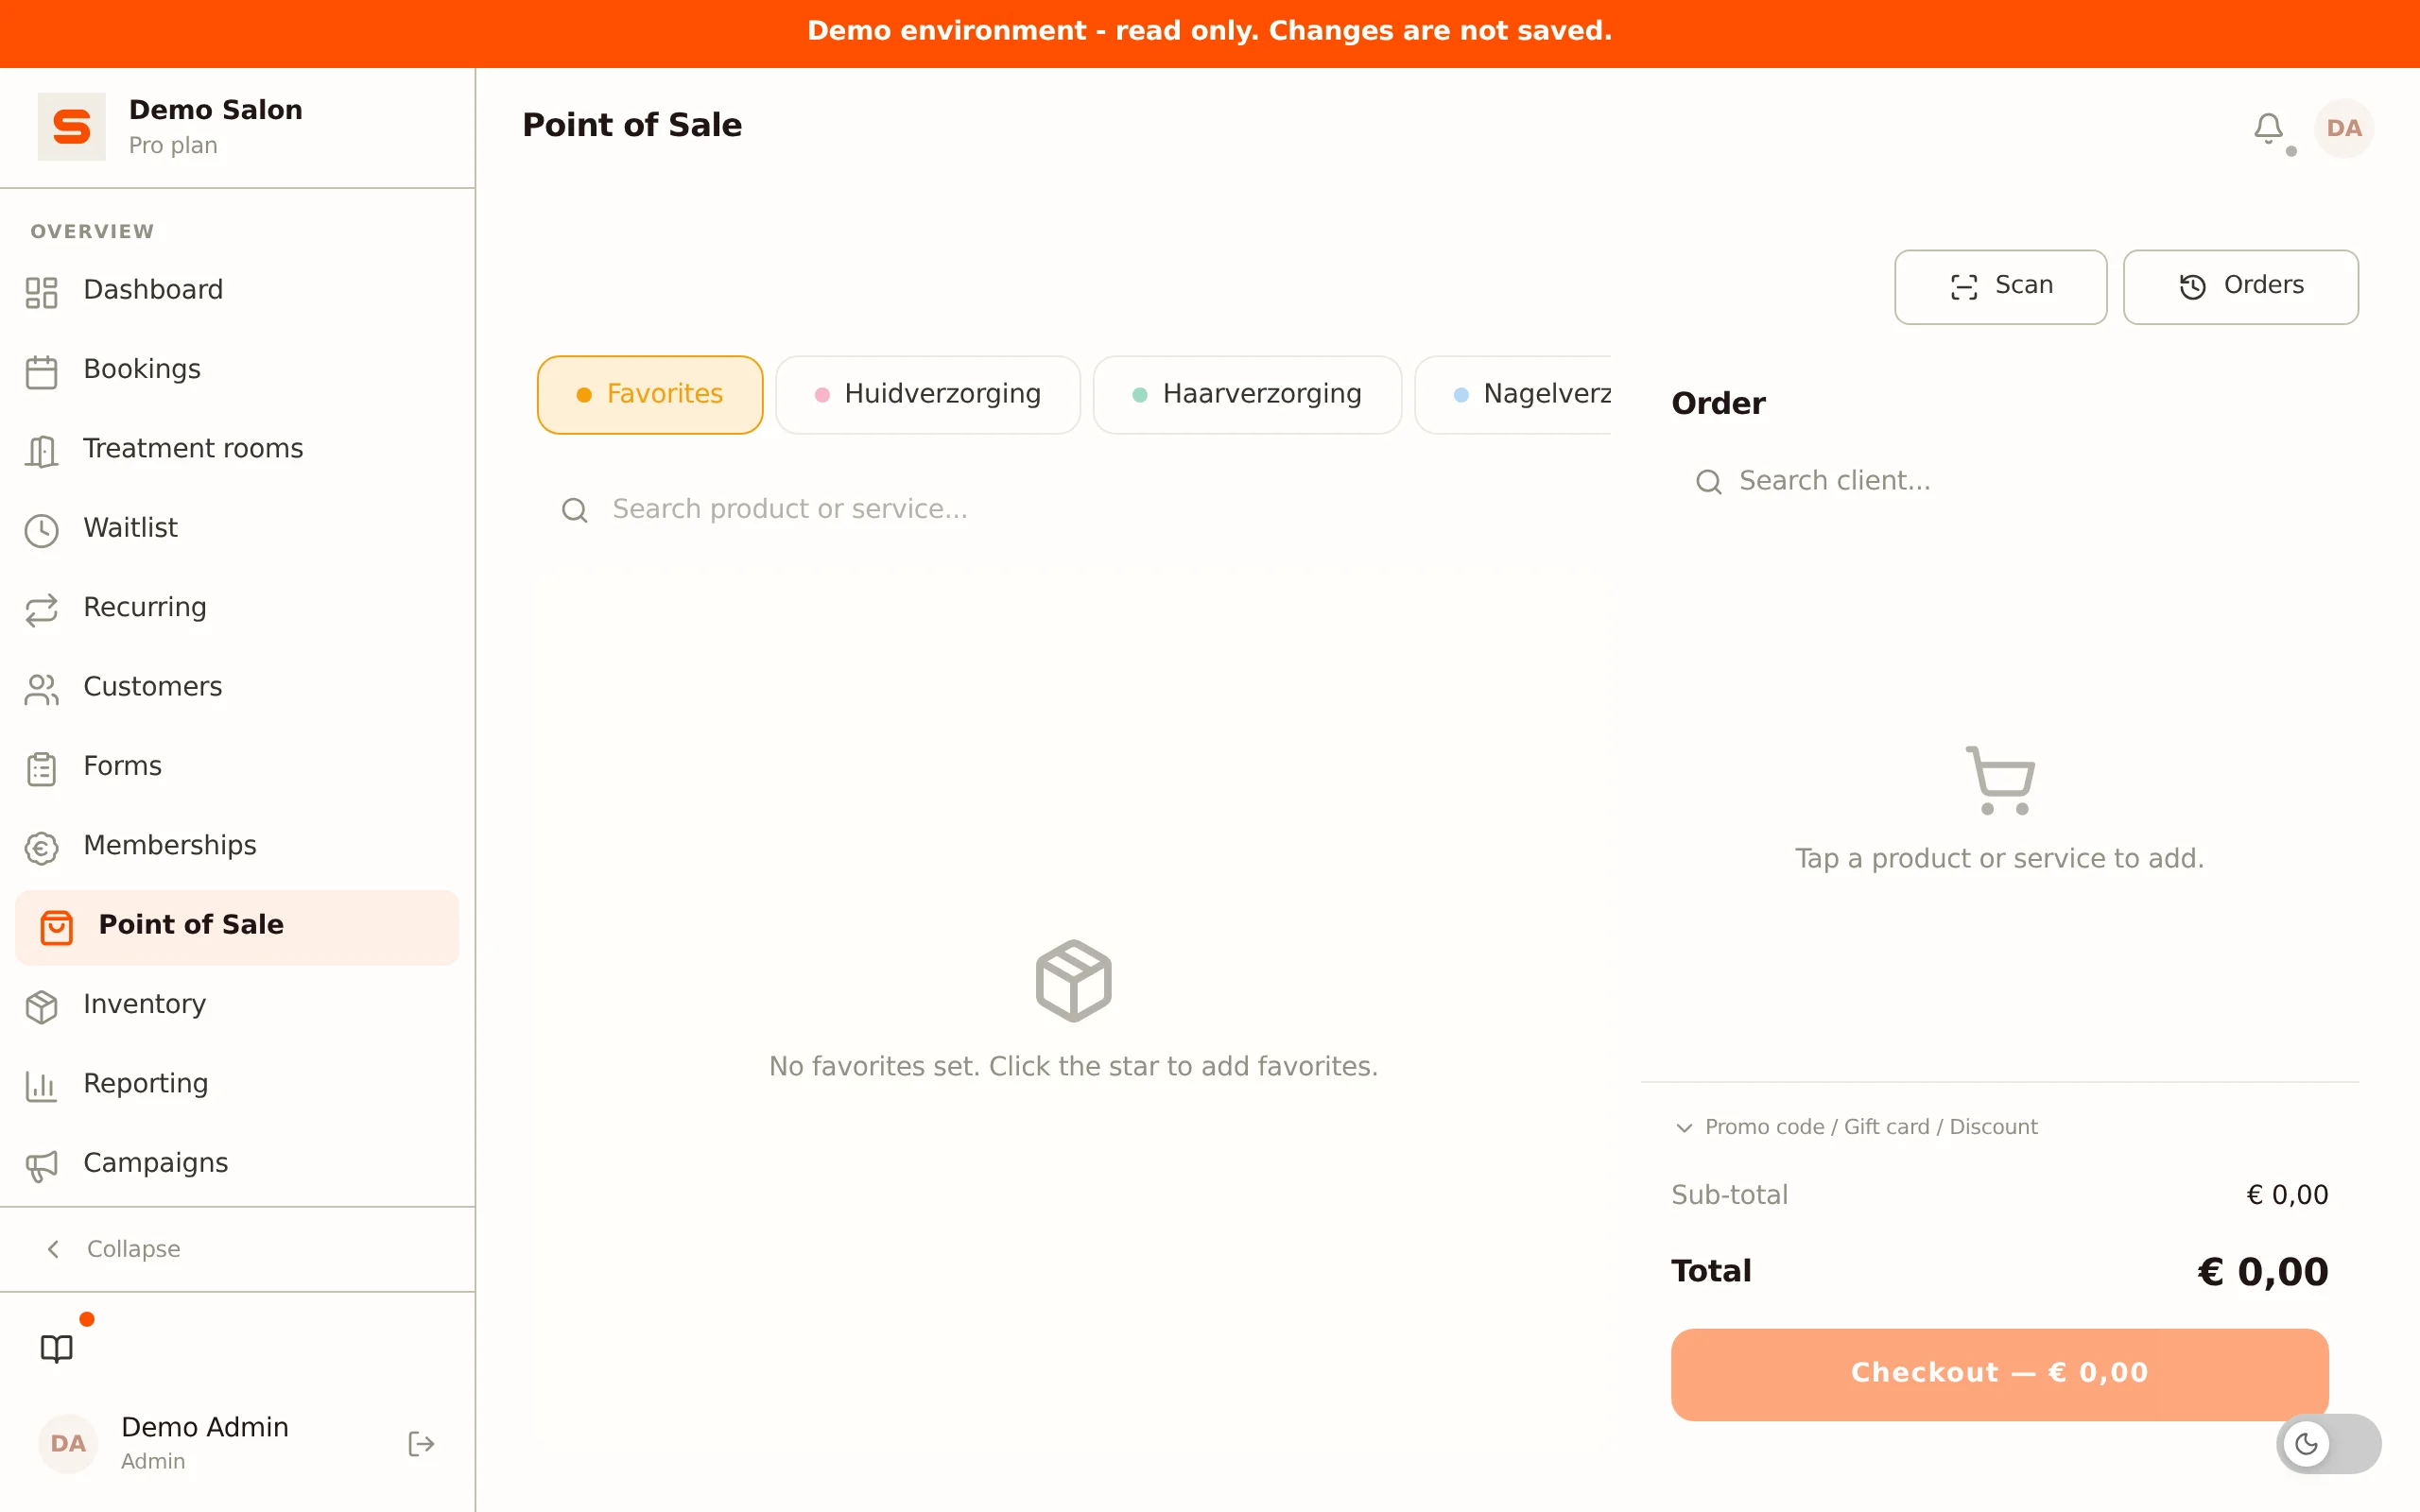
That's it -- sale completed.
If a client has active package credit for the service received, you see this during checkout. The covered service is not charged.
Linking a client
Click the client search at the top and type a name. Pick the right client from the list. A linked client is needed to apply store credit or loyalty points, for a promotion with a maximum per client or a first-visit discount (see Promotions & discount codes), and to automatically send an email receipt. Want to unlink the client? Click the cross next to the name.
Adding products and services
Above the POS screen there are tabs: Favorites, then a tab per treatment category, followed by a tab per product category, Packages (if you use packages) and Promotions (for gift cards). Treatments without a category are grouped in the Other services tab. On a computer you can drag the tabs into a different order; that order is saved and takes precedence over the default. A product category with Visible in POS switched off gets no tab here; you can still find its products by searching or scanning. Use the search field to find a service or product without browsing. Tap a service or product to add it to the receipt. Per line you can adjust the quantity with the plus and minus buttons, or remove the line with the trash icon.
You cannot change the price of a line at the Point of Sale. A treatment or product with a sale price always gets the price from your price list, even if it was changed just now while the Point of Sale was open. A treatment from an appointment keeps the price on the appointment. Want to take something off the amount? Give a discount (see below).
Choosing a size
Sell a product in several sizes -- the same oil in 200ml and 500ml, say -- and it sits on a single tile. Tap it and the till first asks Choose a size, with the price and the stock next to each one. A size that has run out stays visible but cannot be tapped, so you can see that it exists and is empty. A product without sizes goes straight onto the receipt as before. If a product has a refill, the till asks Product or refill?, again with the price and stock per line. How to create sizes and refills is in Services & Products.
Product without a sale price
If a product has no sale price -- for example because you only use it yourself -- the tile reads Custom amount instead of a price. Tap it and the till first asks what you want to charge, just like a gift card. That way you never sell such a product for 0.00 by accident. The same applies when you scan its barcode.
If you enter more than 500.00 for a gift card or a free amount, the till first asks Are you sure? and shows the amount. That way a typo (5025 instead of 50.25) does not end up on the receipt unnoticed. Add puts the amount on the receipt, Cancel takes you back to the amount so you can correct it.
Scanning products
You can add products to the receipt via the Scan button at the top of the POS. Point the camera at the product's barcode or use a connected handheld scanner. Salonnare looks up the product and shows you what it found; press Confirm to put it on the receipt.
The camera only accepts a code once it reads the same value twice. That costs a fraction of a second, but it stops a half-read label from putting the wrong product on the receipt. If scanning keeps failing you'll see a tip to hold the camera still, make sure there's enough light, and show one label at a time. When two barcode stickers sit right next to each other, the camera can't tell them apart: cover the neighbouring sticker, or leave a few millimetres between labels from now on. A connected handheld scanner is unaffected.
Favorites
Do you check out the same services or products all the time? Pin them as favorites for quick access. Tap the star on a tile to mark it as a favorite.
Favorites appear in the Favorites tab at the top of your POS screen, so you can add them with a single tap instead of browsing through categories. Each staff member has their own set of favorites, so everyone can set up the register the way they like.
Discount or voucher
At the bottom of the cart panel there is a collapsible block Discount or voucher. It holds two ways to take something off the amount, and below them you see what has been applied. A discount always applies to the whole receipt, not to a single treatment.
Giving a discount yourself
Handy for a one-off discount for which no promo code exists -- for example a goodwill discount or a rounding.
- Enter the amount in the top field. The sign inside the field shows what you are entering.
- Would you rather deduct a percentage? Set the narrow toggle next to it to %. By default it is set to a fixed amount (EUR).
- Click Apply discount, or press Enter. Typing alone does not change the total yet.
You can adjust the discount afterwards: enter a different value and click Apply discount again. The input field stays put for as long as the discount applies, so you do not have to remove it first.
At checkout Salonnare recalculates the discount amount once more to be safe, so the total never drops below zero.
Entering a code or gift card
Below that there is a field Discount code or gift card. You do not need to know what the client hands you: type the code and click Add, or press Enter. Salonnare tries the discount code first and then falls back to the gift card.
- If it is a valid discount code, the discount is deducted from the total.
- If it is a gift card, the card's balance is settled against the total.
- If Salonnare recognises neither, you get one message: "We don't recognise this code as a discount code or gift card."
If the discount code does exist but may not be used here -- because the promotion has expired, the minimum order amount was not met or the client has already used the promotion the maximum number of times, for example -- you see that reason instead of the general message. If the code could not be checked for a moment, for example because of a faltering connection, Salonnare says so and does not try the code as a gift card. Then try again.
At checkout Salonnare checks the discount code once more and calculates the discount amount itself. If the promotion is no longer valid in the meantime -- for example because the maximum number of uses was just reached at another till -- the receipt is not saved and you see the reason. Remove the discount and check out again. See Promotions & discount codes for all checks.
Use the button with the camera icon next to the field to scan the QR code of a gift card. The scanned code is applied straight away.
Discount codes are part of the Starter plan and up. Without discount codes the field only accepts gift cards and is called Gift card code.
Applied
Every discount that applies is listed under Applied as a chip with the amount and a cross -- for example Discount (25%) - EUR 31.63 or Gift card (ABC123) - EUR 10.00. A discount code and the loyalty discount get such a chip too; for a discount code the name of the promotion is on it.
Click the cross to remove that discount again. The chips stay visible when you collapse the block, so at checkout you always see what is coming off the receipt.
Below them are Sub-total, Discount and Total. Every kind of discount also gets its own line on the receipt the client receives by email, with the percentage included for a percentage discount.
Selling a gift card
You can also sell a gift card directly from the POS:
- Link the client who is buying the gift card.
- Open the Promotions tab and choose Gift card.
- Enter the desired amount.
- Complete the payment.
- Salonnare automatically creates the gift card with a unique code. If the Gift card row is on under Settings > Email templates, the linked client receives the gift card by email. Without a linked client (or with that row off) the gift card is still created and you hand over the code yourself.
Gift cards have a unique code that clients can redeem on a future visit. See Gift cards.
Applying store credit
If the selected client has store credit (for example from an earlier refund), the cart panel shows the block Available store credit. Enter the amount you want to deduct from the total, or click Apply store credit to use the maximum applicable amount at once. Salonnare automatically caps the amount to the balance and to the outstanding total.
The block is only visible if store credit is enabled for your salon and the client actually has credit. See Store credit for how credit is created and managed.
Deposits
If a client paid a deposit when booking online, you see it at checkout as a deduction line on the total. You do not need to enter anything separately -- Salonnare automatically subtracts the deposit from the outstanding amount.
Redeeming loyalty points
If your loyalty program is active, clients collect points on every purchase. Points are redeemed per full card: a fixed number of points gives a fixed discount amount (you set both in the loyalty program).
- Link the client. If they have enough points for at least one full card, the cart panel shows the button Redeem full card.
- Enter the number of full cards the client wants to use and confirm.
- The discount appears under Applied and the points are deducted from the balance at checkout.
- Any remaining amount is settled via the normal payment method.
Tip
The cart panel has a Tip field. Enter the tip amount there if the client gives something extra. The tip is added to the total to be paid, but does not count towards your revenue or VAT.
Checking out and payment method
Click Check out to open the payment step. Which payment methods you see depends on what is connected for your salon:
| Method | How it works | Visible when |
|---|---|---|
| Cash | Record a cash payment. | Always |
| Card | Mark the sale as paid via your standalone card terminal. This is a manual option without an integration -- you process the card payment on your own terminal and confirm the sale in the POS. | Always |
| SumUp | Send the payment request to your connected SumUp card reader. A real integration: the reader is activated automatically. | Only with a SumUp connection |
| Mollie | Process a payment via your connected Mollie terminal. | Only with a Mollie connection |
| Payment link | Create an online payment link, show it as a QR code and/or email it to the client. The client pays on a secure page from Stripe or Mollie. | Only when your default payment provider is Stripe or Mollie and that provider is connected |
Cash and Card are always available. SumUp, Mollie and Payment link only appear once you have connected them. See Payment setup for details.
Card versus SumUp. Card is a manual button for anyone using a standalone, non-connected card terminal -- Salonnare only records the sale as paid. SumUp is a real integration that sends the amount straight to your SumUp card reader. If you have SumUp connected, use the SumUp button for the card payment.
Paying with a payment link (QR or email)
The Payment link method is for clients who want to pay online -- for example with iDEAL, credit card or Apple Pay -- without you needing a physical terminal. Which provider creates the link depends on your default payment provider (see Payment setup): if it is set to Stripe, the link comes via Stripe; if it is set to Mollie, via Mollie.
- Choose Payment link as the payment method.
- Salonnare creates the link and shows a QR code. On a narrow screen the QR code fills the screen large; on a wide screen it appears in the cart column.
- Have the client scan the QR code with their phone camera. They are taken to the secure payment page.
- Prefer to email the link? Click Email link to customer. The client receives the payment link by email. That button is only there when the Payment link row is on under Settings > Email templates.
- The POS shows Waiting for payment... and checks the status automatically. As soon as the client pays, the sale is completed and the success screen appears.
Paid in cash or another way after all? Click Mark as paid manually on the QR screen. The sale is then recorded as paid right away and the open payment link is ignored. Use this as a fallback when the client settles up another way.
When the payment is processed, the order is recorded. If the Receipt row is on under Settings > Email templates and a client with an email address is linked, the client automatically receives the receipt. See Email templates.
After checkout
Once the payment is complete, the Point of Sale shows Payment completed!. If you check out an appointment, the same happens as when you complete that appointment in the calendar:
- The appointment goes to Completed, even if it was still Provisional. The tasks for that appointment in the notification centre disappear.
- The review request follows the usual rules: the morning after the appointment at 09:00, only if review requests are on, the client allows them and has an email address, and at most once per client. See Client Reviews.
- If Follow-up sequences are on (under Settings > Features), they start for this appointment, but only if the appointment ended less than 72 hours ago. An appointment you check out later no longer gets them.
If the appointment was already Completed, nothing starts again. And if Salonnare links a receipt to an appointment only afterwards -- automatically, or because you pick the receipt via the card in the notification centre -- no client email is ever sent: no review request and no follow-up. See Appointment stays on Scheduled.
Linking a loose payment
If the till is interrupted between creating the receipt and starting the payment, the money still arrives but the receipt stays open. Salonnare usually resolves this by itself: if there is exactly one open receipt with exactly that amount around that time, the payment is linked automatically and you notice nothing.
When the choice cannot be made without guessing -- two receipts of the same amount, or an amount that matches none exactly -- you get a Payment without receipt notification. Click it to open the linking screen:
- Pick the payment (if several are open, you see amount and time).
- Pick the receipt it belongs to. Receipts with the same amount come first and are marked same amount.
- Click Link.
The receipt is then completed automatically within a few minutes, as soon as Salonnare has confirmed with the payment provider that the money really arrived.
You can also open the screen on its own with the Link a loose payment button on the Orders tab -- useful once the notification is gone.
No matching receipt at all? Create the receipt again in the till and settle it with the method the customer already paid with.
Viewing order history
Need to look up an earlier sale? In the Point of Sale, click Orders at the top right. Here you can:
- Filter by date, payment method or status (Paid, Pending, Refunded or Credit note).
- Click an order to see the full details.
- Use the right-click menu (or press and hold on mobile) to resend the receipt, open the client or refund the order.
The status shows whether a receipt is Refunded or Partially refunded. The revenue at the top is net: refunds are already deducted. Receipt and credit note numbers run consecutively per salon, without gaps; see Refunds and credit notes.
Refunds
You don't delete a paid receipt, you refund it. Click the receipt and choose Refund. The original receipt stays and Salonnare adds a credit note next to it, so revenue and VAT of the original day do not change. You can refund the whole receipt or part of it, put products back in stock and choose how the money is returned, for example in cash or as store credit on the client profile.
Everything about refunds, partial refunds and credit notes is in Refunds and credit notes.
Tips for a smooth checkout
- Select the client first -- needed for store credit, points and an email receipt.
- Check for packages -- Before checking out, see whether the client has package credit that covers the service.
- Use favorites -- Set up your most common items so checkout takes seconds.
- Email receipts -- It is faster than printing and clients always have a copy.
Want to set up payment methods? See Payment setup. Want to know more about store credit? See Store credit.